前言
埋点数据一般取决于服务提供商想从用户身上获取什么信息。通常来讲,主要分为用户的基本属性信息和行为信息。用户的基本属性信息主要包括:年龄、性别、设备等。行为信息即用户的点击行为和浏览行为,在什么时间,哪个用户点击了哪个按钮,浏览了哪个页面,浏览时长等等的数据。 基本属性信息和行为信息又可以称之为一个简单的报文。报文是网络中交换与传输的数据单元,即站点一次性要发送的数据块。报文包含了将要发送的完整的数据信息,其长短很不一致,长度不限且可变。简单来说就是用户在 App 内有一个操作行为,就会上报一组带有数据的字段。
| 亚马逊云科技开发者社区为开发者们提供全球的开发技术资源。这里有技术文档、开发案例、技术专栏、培训视频、活动与竞赛等。帮助中国开发者对接世界最前沿技术,观点,和项目,并将中国优秀开发者或技术推荐给全球云社区。如果你还没有关注/收藏,看到这里请一定不要匆匆划过,点这里让它成为你的技术宝库! |
本文会演示如何利用开源软件和 Amazon 服务来构建服务端埋点系统,客户端部分不在本文的讨论范围内。
软件架构
Lua 是一种轻量级、可嵌入式的脚本语言,可以非常容易的嵌入到其他语言中使用。另外 Lua 提供了协程并发,即以同步调用的方式进行异步执行,从而实现并发,比起回调机制的并发来说代码更容易编写和理解,排查问题也会容易。Lua 还提供了闭包机制,函数可以作为 First Class Value 进行参数传递,另外其实现了标记清除垃圾收集。
OpenResty® 是一个基于 Nginx 与 Lua 的高性能 Web 平台,其内部集成了大量精良的 Lua 库、第三方模块以及大多数的依赖项。用于方便地搭建能够处理超高并发、扩展性极高的动态 Web 应用、Web 服务和动态网关。OpenResty® 通过汇聚各种设计精良的 Nginx 模块,从而将 Nginx 有效地变成一个强大的通用 Web 应用平台。这样,Web 开发人员和系统工程师可以使用 Lua 脚本语言调动 Nginx 支持的各种 C 以及 Lua 模块,快速构造出足以胜任 10K 乃至 1000K 以上单机并发连接的高性能 Web 应用系统。
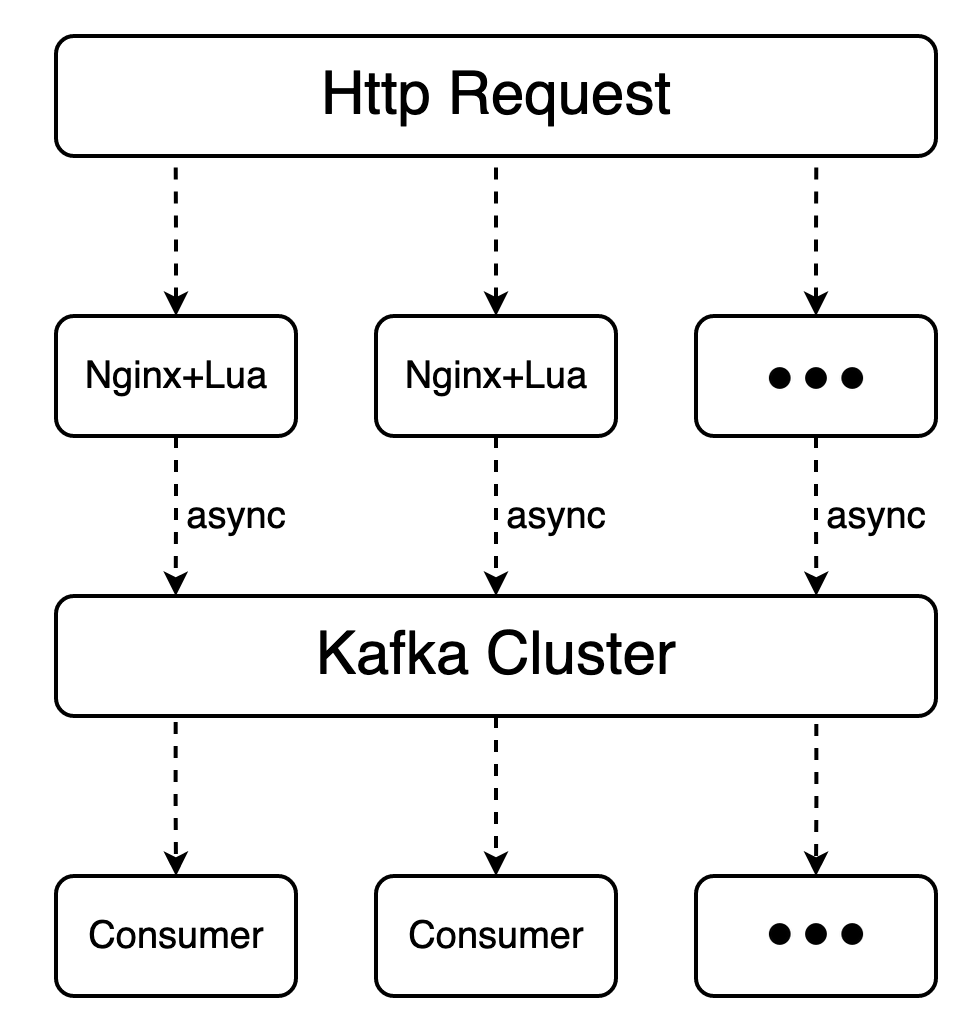
通常会利用 Nginx&Lua 实现服务端日志的统一收集,笔者会利用这项技术实现埋点数据的收集,思路如下:
- 以 Http 请求的方式将埋点数据发送至 Nginx 端;
- 通过 Lua 模块解析请求体,再将埋点数据以异步的方式发送至后端 Kafka。这个过程中数据不用落盘,大大节约了存储空间和提高了效率;
- 最终后端会有一组消费者(例如 Spark)从 Kafka 中将数据落盘(例如 S3);
下图是本文软件层面的架构图。
整体架构
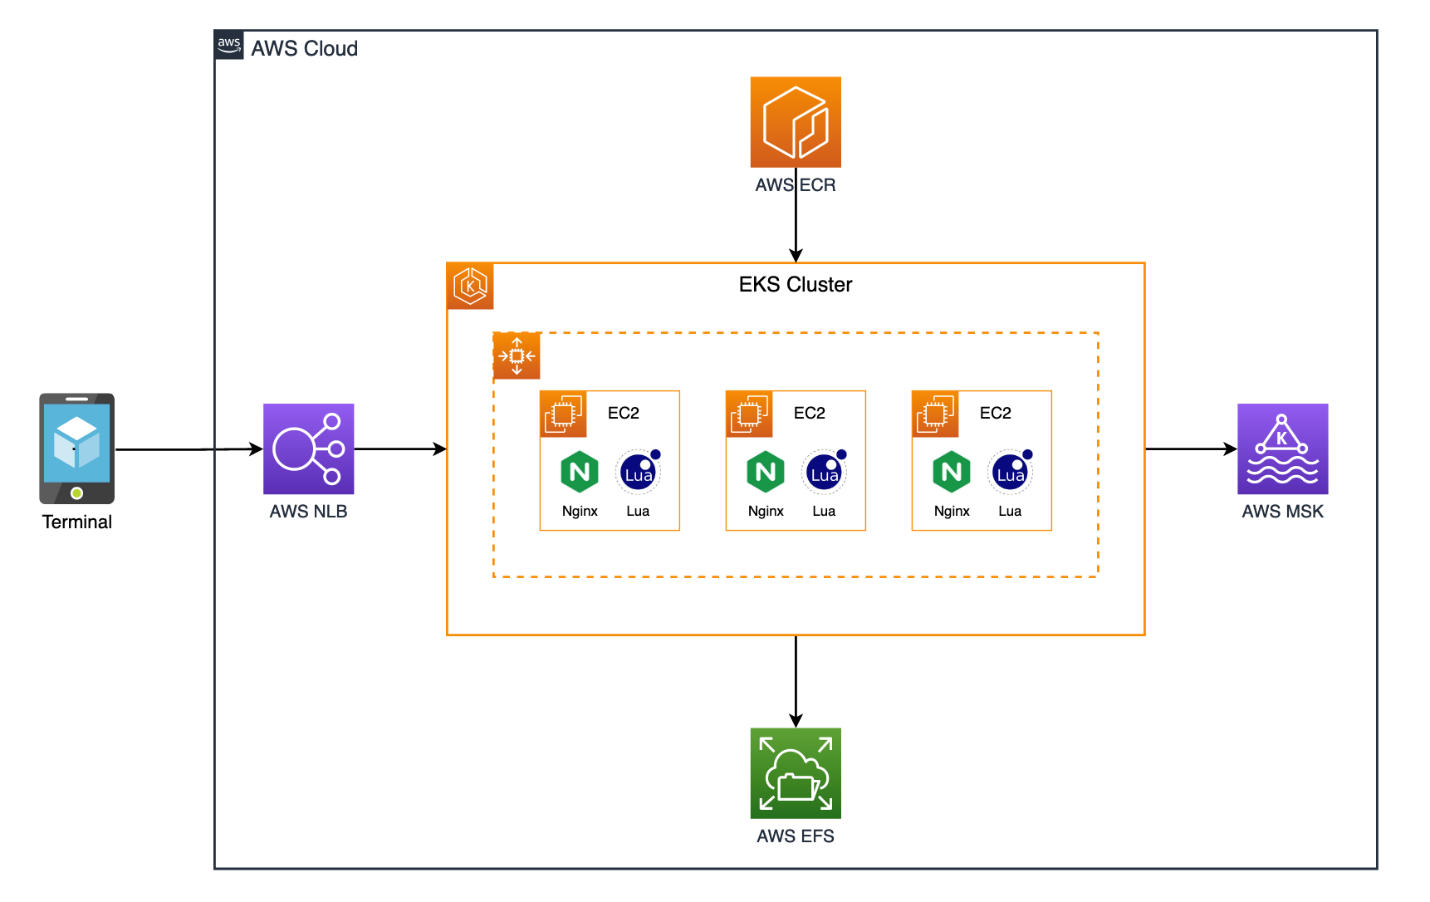
架构分为四大块:
- Amazon EKS,本文会将 Nginx 和 Lua 以容器的形式部署在 Amazon EKS 中,充分利用 EKS 的弹性;
- Amazon MSK,本文会使用托管的 Kafka,也就是 Amazon MSK,降低部署和后期运维的压力;
- Amazon EFS,考虑到整体架构的可用性和持久性,如果在 MSK 端发生了故障,虽然概率极低,本文会使用 Amazon EFS 来存储 Nginx 的错误日志,尽量保证消息的完整性;
- Amazon NLB,本文会使用 NLB 来暴露服务;
- Amazon ECR,本文会使用 ECR 来存储容器镜像;
步骤
在开始之前,请先确保您具有登录 Amazon 全球区控制台的账号,并具备管理员权限。
前提条件
- 一台 Linux 终端
- 足够的 Amazon 账号权限
- 安装 Amazon CLI
- 安装 Docker
- 安装 eksctl
- 安装 kubectl
一、创建 Amazon VPC和Security Group
参考此链接,创建 1个 VPC、3个公有子网、3个私有子网和其他 VPC 资源。接下来笔者会使用 vpcid, publicsubnetid01, publicsubnetid02, publicsubnetid03, privatesubnetid01, privatesubnetid02, privatesubnetid03来代替相关 VPC 和子网资源。
创建一个安全组供后续其他服务使用,为了简便配置,笔者会将本文使用到的资源放入同一个安全组中。读者可以在自己环境中将安全组进行拆分。
###
$ aws ec2 create-security-group --group-name my-poc-sg --description " my-poc-sg " --vpc-id vpcid
###
记录 Security Group ID, 笔者会使用 securitygroupid 来代替它。
###
$ aws ec2 authorize-security-group-ingress \
     --group-id securitygroupid\
     --protocol all\
     --port -1 \
     --source-group securitygroupid
###
二、创建 Amazon MSK
创建 Amazon MSK 集群来接收消息,并记录 Broker 地址,笔者会使用 broker01, broker02, broker03 来代替。
###
$ aws kafka create-cluster \
     --cluster-name "my-poc-msk-cluster" \
     --broker-node-group-info file://brokernodegroupinfo.json \
     --kafka-version "2.6.2" \
     --number-of-broker-nodes 3 \
     --encryption-info EncryptionInTransit={ClientBroker=TLS_PLAINTEXT}
###

brokernodegroupinfo.json
~~~
{
    "InstanceType": "kafka.m5.large",
    "BrokerAZDistribution": "DEFAULT",
    "ClientSubnets": [
      "privatesubnetid01",
      "privatesubnetid02",
      "privatesubnetid03"
    ],
    "SecurityGroups": [
      "securitygroupid "
    ],
    "StorageInfo": {
      "EbsStorageInfo": {
        "VolumeSize": 100
      }
    }
}
~~~
三、构建镜像
使用到的文件包含:
- Dockerfile
- sh
- conf
- conf
- my-poc-send2kafka.lua
###
$ mkdir workdir
$ cd workdir
###
依次按照如下内容创建文件。
Dockerfile
~~~
FROM amazonlinux
COPY install.sh /
RUN chmod +x /install.sh
RUN /install.sh
COPY nginx.conf /opt/openresty/nginx/conf/nginx.conf
COPY common.conf /opt/openresty/nginx/conf/conf.d/common.conf
COPY my-poc-send2kafka.lua /opt/openresty/nginx/lua/my-poc-send2kafka.lua
EXPOSE 80
CMD sed -i "s/\$mypodip/$(hostname -i)/g" /opt/openresty/nginx/conf/conf.d/common.conf && /opt/openresty/nginx/sbin/nginx -c /opt/openresty/nginx/conf/nginx.conf
~~~

install.sh
~~~
#!/bin/sh
yum -y install readline-devel pcre-devel openssl-devel gcc wget tar gzip perl make unzip hostname
mkdir /opt/software
mkdir /opt/module
cd /opt/software/
wget https://openresty.org/download/openresty-1.9.7.4.tar.gz
tar -xzf openresty-1.9.7.4.tar.gz -C /opt/module/
cd /opt/module/openresty-1.9.7.4
./configure --prefix=/opt/openresty \
--with-luajit \
--without-http_redis2_module \
--with-http_iconv_module
make
make install
cd /opt/software/
wget https://github.com/doujiang24/lua-resty-kafka/archive/master.zip
unzip master.zip -d /opt/module/
cp -rf /opt/module/lua-resty-kafka-master/lib/resty/kafka/ /opt/openresty/lualib/resty/
mkdir /opt/openresty/nginx/lua/
mkdir /var/log/nginx/
~~~

nginx.conf
~~~
worker_processes auto;
worker_rlimit_nofile 100000;
daemon off;

events {
    worker_connections 102400;
    multi_accept on;
    use epoll;
}

http {
    include mime.types;
    default_type application/octet-stream;
    log_format main '$remote_addr - $remote_user [$time_local] "$request" '
    '$status $body_bytes_sent "$http_referer" '
    '"$http_user_agent" "$http_x_forwarded_for"';
    access_log /var/log/nginx/access.log main;
    resolver 8.8.8.8;
    #resolver 127.0.0.1 valid=3600s;
    sendfile on;
    keepalive_timeout 65;
    underscores_in_headers on;
    gzip on;
    include /opt/openresty/nginx/conf/conf.d/common.conf;
}
~~~

common.conf
~~~
lua_package_path "/opt/openresty/lualib/resty/kafka/?.lua;;";
lua_package_cpath "/opt/openresty/lualib/?.so;;";
lua_shared_dict ngx_cache 128m;
lua_shared_dict cache_lock 100k;

server {
    listen 80;
    server_name 127.0.0.1;
    root html;
    lua_need_request_body on;
    access_log /var/log/nginx/access.log main;
    error_log /var/log/nginx/error-$mypodip.log notice;
    location = /putmessage {
        lua_code_cache on;
        charset utf-8;
        default_type 'application/json';
        content_by_lua_file "/opt/openresty/nginx/lua/my-poc-send2kafka.lua";
    }
}
~~~

my-poc-send2kafka.lua
~~~
local producer = require("resty.kafka.producer")
local json = require("cjson")

local broker_list = {
  {host = "broker01", port = 9092},
  {host = "broker02", port = 9092},
  {host = "broker03", port = 9092}
}

local log_json = {}

log_json["body"] = ngx.req.read_body()
log_json["body_data"] = ngx.req.get_body_data()

local topic = ngx.req.get_headers()["topic"]


local producer_error_handle = function(topic, partition_id, queue, index, err, retryable)
  ngx.log(ngx.ERR, "Error handle: index ", index, ' partition_id ', partition_id, ' retryable ', retryable, ' json ', json.encode(queue))
end


local bp = producer:new(broker_list, { producer_type = "async", batch_num = 200, error_handle = producer_error_handle})

local sendMsg = json.encode(log_json)

local ok, err = bp:send(topic, nil, sendMsg)
~~~

###
$ docker build -t  my-poc-image .
###
四、创建 Amazon ECR 并上传镜像
aws ecr create-repository \
    --repository-name my-poc-ecr/nginx-lua

###
$ aws ecr get-login-password --region regioncode | docker login --username AWS --password-stdin youraccountid.dkr.ecr.regioncode.amazonaws.com
$ docker tag my-poc-image:latest youraccountid.dkr.ecr.regioncode.amazonaws.com/my-poc-ecr/nginx-lua:latest
$ docker push youraccountid.dkr.ecr.regioncode.amazonaws.com/my-poc-ecr/nginx-lua:latest
###
五、创建 Amazon EFS
###
aws efs create-file-system \
    --performance-mode generalPurpose \
    --throughput-mode bursting \
    --encrypted \
    --region ap-northeast-1 \
    --tags Key=Name,Value=my-poc-efs
###
记录 FileSystemId,笔者会使用 fsid 来代替它。
###
aws efs create-mount-target \
    --file-system-id fsid  \
    --subnet-id privatesubnetid01 \
    --security-groups securitygroupid

aws efs create-mount-target \
    --file-system-id fsid \
    --subnet-id privatesubnetid02 \
    --security-groups securitygroupid

aws efs create-mount-target \
    --file-system-id fsid \
    --subnet-id privatesubnetid03 \
    --security-groups securitygroupid
###
六、创建Amazon EKS集群并安装组件
cluster.yaml
###
apiVersion: eksctl.io/v1alpha5
kind: ClusterConfig

metadata:
  name: my-poc-eks-cluster
  region: ap-northeast-1
  version: "1.21"

iam:
  withOIDC: true

addons:
- name: vpc-cni
  version: v1.11.2-eksbuild.1
- name: coredns
  version: v1.8.4-eksbuild.1
- name: kube-proxy
  version: v1.21.2-eksbuild.2

vpc:
  subnets:
    private:
      ap-northeast-1a: { id: "privatesubnetid01" }
      ap-northeast-1c: { id: "privatesubnetid02" }
      ap-northeast-1d: { id: "privatesubnetid03" }

managedNodeGroups:
  - name: my-poc-ng-1
    instanceType: m5.large
    desiredCapacity: 2
    volumeSize: 100
    privateNetworking: true
###

###
$ eksctl create cluster -f cluster.yaml
###
参考此链接安装 Amazon Load Balancer Controller。
参考此链接安装 Amazon EFS CSI driver。
七、在 Amazon EKS 中部署
###
$ kubectl apply -f deploy.yaml
###

deploy.yaml
~~~
---
kind: StorageClass
apiVersion: storage.k8s.io/v1
metadata:
  name: efs-sc
provisioner: efs.csi.aws.com
parameters:
  provisioningMode: efs-ap
  fileSystemId: fsid
  directoryPerms: "700"
  gidRangeStart: "1000"
  gidRangeEnd: "2000"
  basePath: "/dynamic_provisioning"
---
apiVersion: v1
kind: PersistentVolumeClaim
metadata:
  name: my-poc-pvc
spec:
  accessModes:
    - ReadWriteMany
  storageClassName: efs-sc
  resources:
    requests:
      storage: 5Gi
---
apiVersion: apps/v1
kind: Deployment
metadata:
  name: nginx-lua
  labels:
    app: nginx-lua
spec:
  replicas: 2
  selector:
    matchLabels:
      app: nginx-lua
  template:
    metadata:
      labels:
        app: nginx-lua
    spec:
      containers:
      - name: nginx-lua
        image: youraccountid.dkr.ecr.regioncode.amazonaws.com/my-poc-ecr/nginx-lua:latest
        ports:
        - containerPort: 80
        resources:
          limits:
            cpu: 500m
          requests:
            cpu: 200m
        volumeMounts:
        - name: my-poc-volume
          mountPath: /var/log/nginx
      volumes:
      - name: my-poc-volume
        persistentVolumeClaim:
          claimName: my-poc-pvc
---
apiVersion: v1
kind: Service
metadata:
  name: nginx-lua-svc
  annotations:
    service.beta.kubernetes.io/aws-load-balancer-type: external
    service.beta.kubernetes.io/aws-load-balancer-nlb-target-type: ip
    service.beta.kubernetes.io/aws-load-balancer-scheme: internet-facing
    service.beta.kubernetes.io/aws-load-balancer-subnets: publicsubnetid01, publicsubnetid02, publicsubnetid03
    service.beta.kubernetes.io/aws-load-balancer-name: my-poc-nginx-lua
    service.beta.kubernetes.io/aws-load-balancer-attributes: load_balancing.cross_zone.enabled=true
spec:
  selector:
    app: nginx-lua
  type: LoadBalancer
  ports:
    - protocol: TCP
      port: 80
      targetPort: 80
~~~
使用以下命令获取 EXTERNAL-IP 地址,笔者会使用 nlbdns 来代替。
###
$ kubectl get svc nginx-lua-svc
###
八、功能测试
参考此链接安装 kafka 客户端。
创建测试用 Topic。
###
$ ./kafka-topics.sh --topic my-poc-topic-01 --create --bootstrap-server broker01:9092, broker02:9092, broker03:9092 --partitions 3 --replication-factor 2
###
安装 ApacheBench 测试工具,并进行测试。
###
$ sudo yum -y install httpd-tools
$ ab -T 'application/json' -H "topic: my-poc-topic-01" -n 1000 -p postdata.json http://nlbdns/putmessage
###

postdata.json
~~~
{
    "uuid": "2b8c376e-bd20-11e6-9ebf-525499b45be6",
    "event_time": "2016-12-08T18:08:12",
    "page": "www.example.com/poster.html",
    "element": "register",
    "attrs":
    {
        "title": "test",
        "user_id": 1234
    }
}
~~~
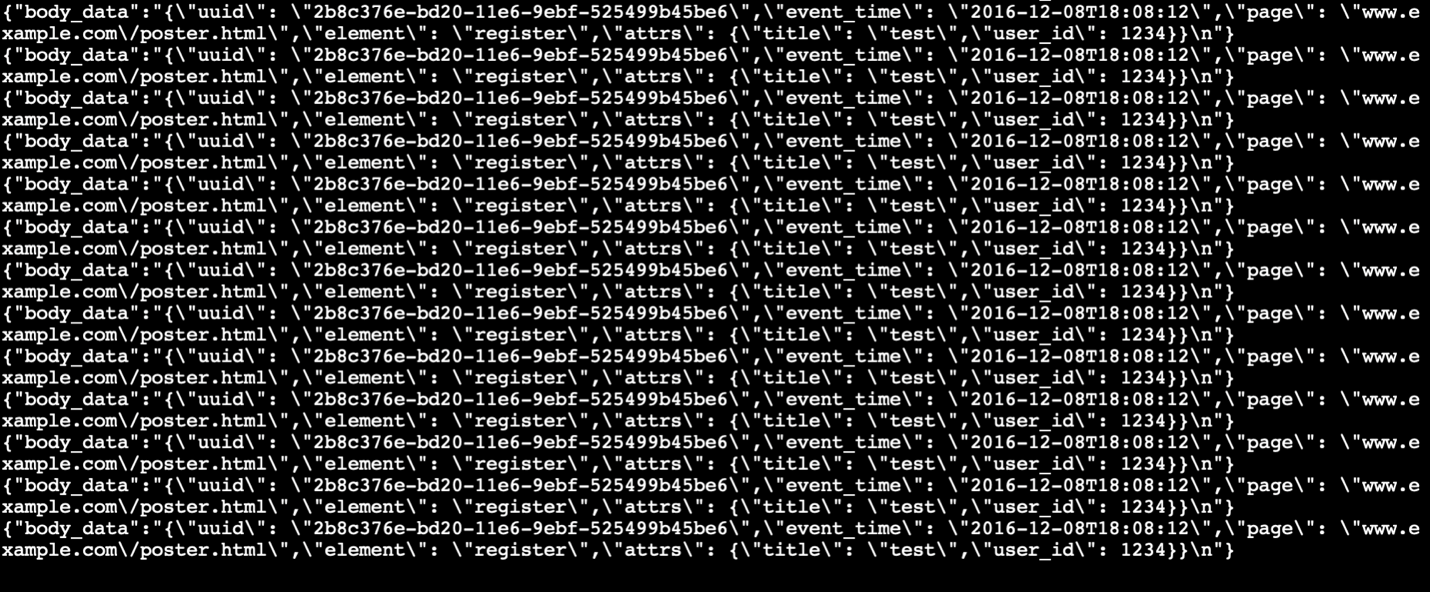
查看消息是否可以成功消费。
###
./kafka-console-consumer.sh --bootstrap-server broker01:9092, broker02:9092, broker03:9092 --topic my-poc-topic-01 --from-beginning
###
消息已经成功消费。
接下来笔者会给一个不存在的 topic 发送消息,用来模拟生产环境中后端 MSK 不可用的情况。
###
$ ab -T 'application/json' -H "topic: my-poc-topic-noexist" -n 1000 -p postdata.json http://nlbdns/putmessage
###
按照预想状况,这部分消息会以错误日志的形式保留在 Amazon EFS 中。
###
$ ab -T 'application/json' -H "topic: my-poc-topic-noexist" -n 1000 -p postdata.json http://nlbdns/putmessage
###
进入 EFS 中,打开带有 pod ip 的错误日志,可以看到错误信息被记录了下来。

本篇作者

杨探
亚马逊云科技解决方案架构师,负责互联网行业云端架构咨询和设计。
文章来源:https://dev.amazoncloud.cn/column/article/6309d47976658473a321ffdc?sc_channel=bokey