CreateIndex API执行流程源码解析
milvus版本:v2.3.2
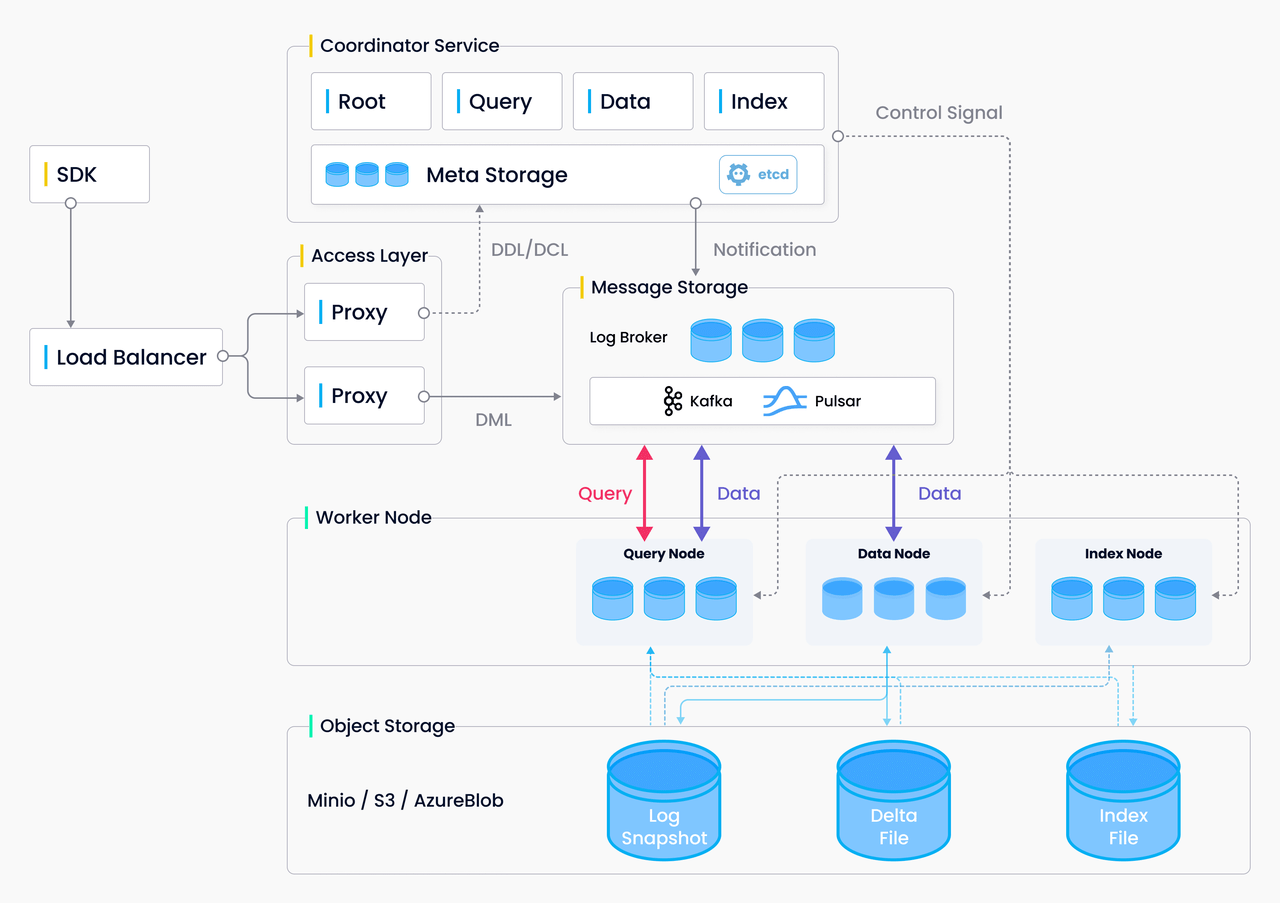
整体架构:
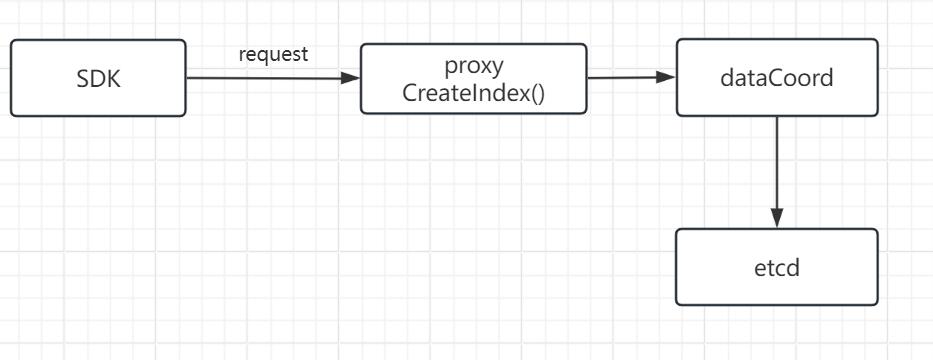
CreateIndex 的数据流向:
1.客户端sdk发出CreateIndex API请求。
import numpy as np
from pymilvus import (
    connections,
    FieldSchema, CollectionSchema, DataType,
    Collection,
)

num_entities, dim = 2000, 8


print("start connecting to Milvus")
connections.connect("default", host="192.168.230.71", port="19530")


fields = [
    FieldSchema(name="pk", dtype=DataType.VARCHAR, is_primary=True, auto_id=False, max_length=100),
    FieldSchema(name="random", dtype=DataType.DOUBLE),
    FieldSchema(name="embeddings", dtype=DataType.FLOAT_VECTOR, dim=dim)
]

schema = CollectionSchema(fields, "hello_milvus is the simplest demo to introduce the APIs")

print("Create collection `hello_milvus`")
hello_milvus = Collection("hello_milvus", schema, consistency_level="Strong")


print("Start inserting entities")
rng = np.random.default_rng(seed=19530)
entities = [
    # provide the pk field because `auto_id` is set to False
    [str(i) for i in range(num_entities)],
    rng.random(num_entities).tolist(),  # field random, only supports list
    rng.random((num_entities, dim)),    # field embeddings, supports numpy.ndarray and list
]

insert_result = hello_milvus.insert(entities)

hello_milvus.flush()

print("Start Creating index IVF_FLAT")
index = {
    "index_type": "IVF_FLAT",
    "metric_type": "L2",
    "params": {"nlist": 8},
}

hello_milvus.create_index("embeddings", index,index_name="idx_embeddings")
客户端SDK向proxy发送一个CreateIndex API请求,在embeddings列上创建一个名为idx_embeddings的索引。
2.客户端接受API请求,将request封装为createIndexTask,并压入ddQueue队列。
代码路径:internal\proxy\impl.go
// CreateIndex create index for collection.
func (node *Proxy) CreateIndex(ctx context.Context, request *milvuspb.CreateIndexRequest) (*commonpb.Status, error) {
	......

	// request封装为task
	cit := &createIndexTask{
		ctx:                ctx,
		Condition:          NewTaskCondition(ctx),
		req:                request,
		rootCoord:          node.rootCoord,
		datacoord:          node.dataCoord,
		replicateMsgStream: node.replicateMsgStream,
	}

	......
    // 将task压入ddQueue队列

	if err := node.sched.ddQueue.Enqueue(cit); err != nil {
		......
	}

	......
    // 等待cct执行完
	if err := cit.WaitToFinish(); err != nil {
		......
	}

	......
}
3.执行createIndexTask的3个方法PreExecute、Execute、PostExecute。
PreExecute()一般为参数校验等工作。
Execute()一般为真正执行逻辑。
代码路径:internal\proxy\task_index.go
func (cit *createIndexTask) Execute(ctx context.Context) error {
	......
	req := &indexpb.CreateIndexRequest{
		CollectionID:    cit.collectionID,
		FieldID:         cit.fieldSchema.GetFieldID(),
		IndexName:       cit.req.GetIndexName(),
		TypeParams:      cit.newTypeParams,
		IndexParams:     cit.newIndexParams,
		IsAutoIndex:     cit.isAutoIndex,
		UserIndexParams: cit.newExtraParams,
		Timestamp:       cit.BeginTs(),
	}
	cit.result, err = cit.datacoord.CreateIndex(ctx, req)
	......
	SendReplicateMessagePack(ctx, cit.replicateMsgStream, cit.req)
	return nil
}
从代码可以看出调用了datacoord的CreateIndex接口。
4.进入datacoord的CreateIndex接口。
代码路径:internal\datacoord\index_service.go
// CreateIndex create an index on collection.
// Index building is asynchronous, so when an index building request comes, an IndexID is assigned to the task and
// will get all flushed segments from DataCoord and record tasks with these segments. The background process
// indexBuilder will find this task and assign it to IndexNode for execution.
func (s *Server) CreateIndex(ctx context.Context, req *indexpb.CreateIndexRequest) (*commonpb.Status, error) {
......
// 分配indexID,indexID=0
indexID, err := s.meta.CanCreateIndex(req)
......
if indexID == 0 {
// 分配indexID
indexID, err = s.allocator.allocID(ctx)
......
}
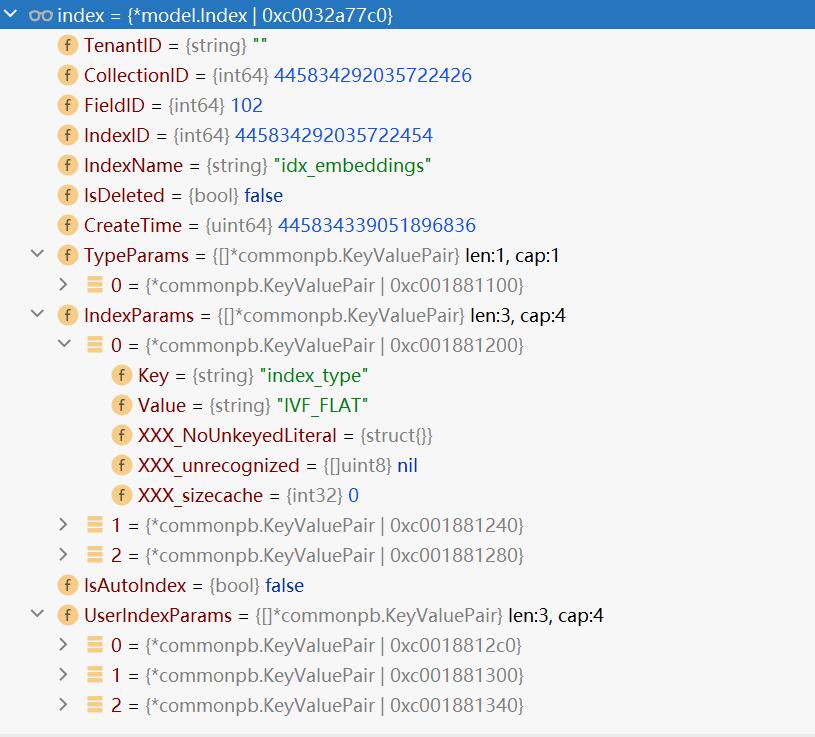
index := &model.Index{
CollectionID: req.GetCollectionID(),
FieldID: req.GetFieldID(),
IndexID: indexID,
IndexName: req.GetIndexName(),
TypeParams: req.GetTypeParams(),
IndexParams: req.GetIndexParams(),
CreateTime: req.GetTimestamp(),
IsAutoIndex: req.GetIsAutoIndex(),
UserIndexParams: req.GetUserIndexParams(),
}
// Get flushed segments and create index
err = s.meta.CreateIndex(index)
......
// 将collectionID发送到channel,其它的goroutine进行消费。
select {
case s.notifyIndexChan <- req.GetCollectionID():
default:
}
......
}
变量index:
5.进入s.meta.CreateIndex()
代码路径:internal\datacoord\index_meta.go
func (m *meta) CreateIndex(index *model.Index) error {
	......
	// 写入etcd元数据
	if err := m.catalog.CreateIndex(m.ctx, index); err != nil {
		......
	}

	m.updateCollectionIndex(index)
	......
}
在这里重点研究m.catalog.CreateIndex()这个方法做了什么事情。
func (kc *Catalog) CreateIndex(ctx context.Context, index *model.Index) error {
	key := BuildIndexKey(index.CollectionID, index.IndexID)

	value, err := proto.Marshal(model.MarshalIndexModel(index))
	if err != nil {
		return err
	}

	err = kc.MetaKv.Save(key, string(value))
	if err != nil {
		return err
	}
	return nil
}
在etcd会产生1个key。
field-index/445834678636119060/445834678636519085
value的值的结构为indexpb.FieldIndex,然后进行protobuf序列化后存入etcd。
因此etcd存储的是二进制数据。
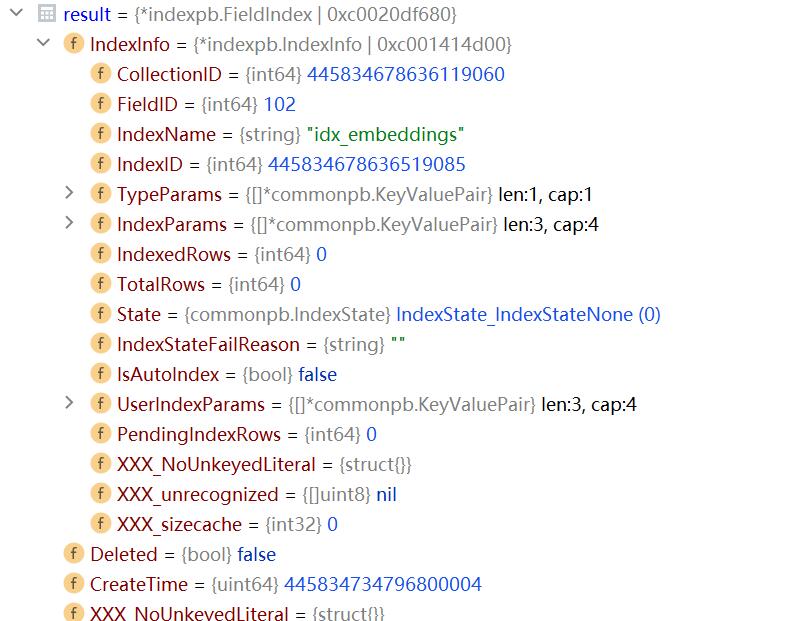
&indexpb.FieldIndex{
	IndexInfo: &indexpb.IndexInfo{
		CollectionID:    index.CollectionID,
		FieldID:         index.FieldID,
		IndexName:       index.IndexName,
		IndexID:         index.IndexID,
		TypeParams:      index.TypeParams,
		IndexParams:     index.IndexParams,
		IsAutoIndex:     index.IsAutoIndex,
		UserIndexParams: index.UserIndexParams,
	},
	Deleted:    index.IsDeleted,
	CreateTime: index.CreateTime,
}
跟踪BuildIndexKey()函数,即可以得到key的规则。整理如下:
key规则:
- 前缀/field-index/{collectionID}/
可以反映index属于哪个collection。Index的value可以反映属于哪个field。
不能反映属于哪个partition、哪个segment。
总结:
- CreateIndex由proxy传递给协调器dataCoord操作etcd。
- CreateIndex最终会在etcd上写入1种类型的key(其实还有一种,在另一篇中进行介绍)。